Difference between revisions of "Compounding"
From Rx-wiki
m |
|||
| Line 1: | Line 1: | ||
| − | |||
| − | |||
The art of pharmaceutical compounding has ancient roots dating back to early hunter gatherer societies. These ancient civilizations utilized pharmaceutical compounding for religion, grooming, keeping the healthy well, treating the ill and preparing the dead. These ancient compounders produced the first oils from plants and animals. They discovered poisons and the antidotes. They made ointments for wounded patients as well as perfumes for customers. | The art of pharmaceutical compounding has ancient roots dating back to early hunter gatherer societies. These ancient civilizations utilized pharmaceutical compounding for religion, grooming, keeping the healthy well, treating the ill and preparing the dead. These ancient compounders produced the first oils from plants and animals. They discovered poisons and the antidotes. They made ointments for wounded patients as well as perfumes for customers. | ||
Revision as of 17:38, 6 March 2013
The art of pharmaceutical compounding has ancient roots dating back to early hunter gatherer societies. These ancient civilizations utilized pharmaceutical compounding for religion, grooming, keeping the healthy well, treating the ill and preparing the dead. These ancient compounders produced the first oils from plants and animals. They discovered poisons and the antidotes. They made ointments for wounded patients as well as perfumes for customers.
Today compounding is still a necessary skill for many pharmacists and pharmacy technicians. Extemporaneous compounding can be defined as the preparation, mixing, assembling, packaging, and labeling of a drug product based on a prescription from a licensed practitioner for the individual patient in a form that the drug is not readily available in (extemporaneous = impromptu, compounding = the act of combining things). Extemporaneous compounding is required for prescription orders that are not commercially available in the requested strength or dosage form.
There are two types of pharmaceutical compounding, sterile (ophthalmics, IVs, parenteral nutrition, chemotherapy, and various other injectables) and nonsterile (creams, ointments, oral suspensions, capsules, suppositories, medication sticks, troches, etc.). This Entry will primarily focus on nonsterile compounding.
Contents
Categories of nonsterile compounding
USP Chapter <1075> has designated three categories of compounding related to different levels of required experience, training, and physical facilities. The considerations factoring into this are:
- the difficulty/complexity of the compound,
- product stability and warnings,
- packaging and storage requirements,
- the physical dosage forms,
- the complexity of calculations required,
- local versus systemic effects of the product,
- risk to the compounder, and
- risk to the patient.
These categories are broken into Simple, Moderate, and Complex compounding. Simple compounding involves preparing compounds from USP monographs and peer-reviewed journals or even just reconstituting and manipulating commercial products within manufacturer guidelines. Required procedures and equipment are well documented. Moderate compounding requires special calculations and procedures and is generally not as well documented as Simple compounding. Complex compounding requires special training, environment, facilities, equipment, and procedures.
Basic steps for preparing compounded drug preparations
Regardless of the compounding category, there is a general order of work for all extemporaneous compounding. By following a procedure you will be able to work more effectively.
- Carefully read and interpret the prescription or medication order.
- Note any missing or confusing information; clarify, gather, and add this information to the drug order.
- Check the dose,dosage regimen, dosage form, and route of administration for appropriateness.
- Determine a preliminary compounding procedure.
- Perform necessary calculations. If possible have a colleague check calculations.
- Select required ingredients. It is the responsibility of the pharmacist to choose appropriate quality ingredients for compounding. The preferred grade for this is USP or NF. If an official USP or NF ingredient is not available, the pharmacist should use professional judgment in the selection of an alternative source so that the safety and purity of the ingredient is assured. This may require requesting a certificate of analysis from the supplier.
- Choose appropriate compounding equipment.
- Using recommended techniques, prepare the product.
- A visual inspection of the product should be done.
- Choose an appropriate container and package the preparation.
- Determine an appropriate expiration date (beyond-use date)
- Label container and include recommended auxiliary labels
- Document the compounding process.
Legal issues
As explained in the Food and Drug Administration Modernization Act, there is a special exemption to ensure continued availability of compounded drug products prepared by pharmacists to provide patients with individualized therapies not available commercially. The lack of commercial availability is the primary determining factor as to whether or not a pharmacy is legally allowed to compound a medication that a physician has written for.
The legal duties of the pharmacy technician are to perform nonjudgmental technical duties associated with the preparation and distribution of prescription drugs, provided that a pharmacist verifies the accuracy of all acts, tasks, and functions performed by the technician and that the technician functions under the direct supervision of and is responsible to a pharmacist. Accurate record keeping can be facilitated by a pharmacy technician who can maintain a control log of all ingredients, lot numbers, and amounts used in compounded preparations, as well as assigned prescription numbers.
The pharmacist is responsible for the actions of the technician and the quality of each preparation. The pharmacist must evaluate the preparation of the compounded prescription as it is prepared by the pharmacy technician and must review that prescription before it is dispensed.
Lab safety
The vast majority of chemicals used in compounding have a relatively low safety risk, but that does not mean that all items used in compounding have little or no risk. There are several things that should be kept in mind when compounding:
- Personal Protective Equipment (PPE)
- gloves
- goggles or face shield
- lab coats or gowns
- masks or respirators
- ventilation hoods
- Eye Wash Station
- Material Safety Data Sheets (MSDS)
- Initial incident reports in case of an injury (no matter how minor)
Equipment
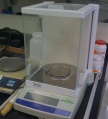
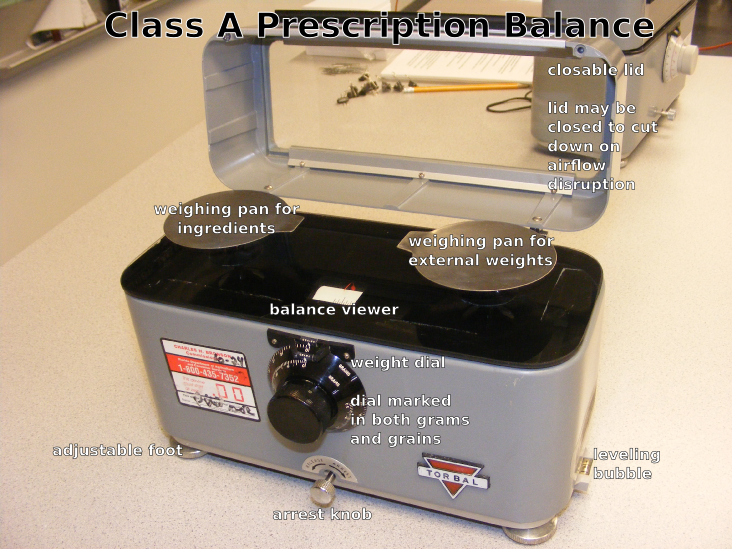
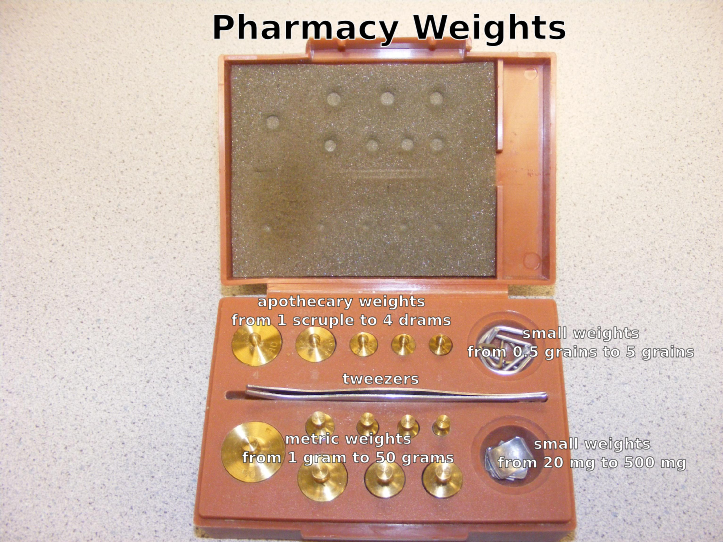
Below is a list of equipment commonly used for extemporaneous compounding followed by a set of images.
- Mortar and pestle
- Class A prescription balance (Class III balance)
- Pharmacy weights
- Electronic balance
- Analytical balance
- Glassine papers (weighing papers)
- Weighing boats (weighing canoes)
- Ointment slab or pad
- Spatula
- Spatula cards
- Scoopula
- Glass stirring rods
- Hot plate
- Magnetic stir
- Beakers
- Graduated cylinder
- Erlenmeyer flask
- Droppers
- Funnels
- Oral syringes
- Ointment jars and tubes
- Prescription vials
- Bottles
Weighing and measuring
Accuracy is a chief concern when it comes to weighing (pharmacy prefers the term weight to mass) and measuring the necessary quantity of ingredients for pharmaceutical compounding. The United States Pharmacopeia (USP) allows a tolerance of plus or minus 5 percent for most preparations.
Weighing
Weighing items may involve a traditional prescription balance along with a set of weights or by more modern means using an electronic and/or analytical balance.
A Class A prescription balance is also known as a double-pan (2-pan) torsion balance; now designated a Class III balance. Class III balances have a minimal weighable quantity (MWQ) of 120 mg and must have a maximum weighable quantity (the capacity) of 60 grams, though some will weigh up to 120 grams; you need to look at the stated capacity of the balance.
The sensitivity (sensitivity requirement) of a balance is the amount of weight that will move balance pointer one-division marker on the marker plate. If you attempt to weigh something less than the balance's sensitivity requirement, the balance will give you a reading of zero, that is, the mass on the balance is too small for it to sense.
A Class III balance has a maximum sensitivity requirement of 6 mg to produce a change of one index division in the rest point as shown by the balance indicator. The smaller the weight required to produce this one division displacement, the greater is the sensitivity of the balance.
Electronic single-pan balances have internal weights, digital display features, and readability and precision of 1 mg; are available at relatively reasonable costs. Most find these balances easier to use and more accurate than a traditional double-pan balance.
Weighing papers and weighing boats
Never place weights, drugs, or chemicals directly onto a balance pan. This includes the balance pan of an electronic or analytical balance. Gassine weighing papers or weighing canoes are generally preferred for weighing. Glassine papers have a smooth, shiny surface that does not absorb materials placed on them, and drugs and chemicals are easily slipped off for a complete transfer. The paper should be diagonally creased from each corner or folded in quarters and then flattened and placed on the pans. This helps to contain the substance being weighed and prevents spilling on the balance pans or balance platform. New weighing papers or weighing boats should be used with each new drug to prevent contamination
Prescription balance and weights
There are some general rules about using a balance that help to maintain a prescription balance in top condition.
- Always use the balance on a level surface and in a draft free area
- Always cover both pans with weighing papers or use weighing boats. These protect the pans from abrasions, eliminate the need for repeated washing, and reduce loss of drug to porous surfaces
- A clean paper or boat should be used for each new ingredient to prevent cross contamination of components
- The balance must be readjusted after a new weighing paper or boat has been placed on each pan. Weighing papers taken from the same box can vary in weight by as much as 65 mg. Larger weighing boats can vary as much as 200 mg
- Always arrest the balance before adding or removing weight from either pan. *Although the balance is noted for its durability, repeated jarring of the balance will ultimately damage the working mechanism of the balance and reduce its accuracy
- Use a spatula to add or remove ingredients from the balance. Do not pour ingredients out of the bottle
- Always clean the balance, close the lid, and arrest the pans before storing the balance between uses
The following are steps for how to use a prescription balance:
- Arrest the balance by turning the arrest knob. Level the balance (front to back) by turning the leveling screw feet all the way into the balance and then moving them the same direction until the 4 sides of the balance are equidistant from the bench. For balances with leveling bubbles, move the leveling screw feet until the bubble is in the middle of the tube.
- Set the internal weights to zero. This is done by turning the calibrated dial to zero.
- Level the balance (left to right) by adjusting the leveling screw feet. To shift the pointer left, grasp both the screw feet between the thumbs and forefingers and rotate so that thumbs move inward. To shift the pointer to the right, rotate both screw feet so that forefingers move toward back of the balance. Continue adjusting the screw feet slowly until the pointer rests at the center of the index or swings equal distances to the right and left of the center.
- Place one weigh boat on each weighing pan. The small weigh boats will hold up to 2 g., while the larger weigh boats will hold up to 30 g.
- Unlock the balance by releasing the arrest knob and note the rest point of the pointer on the index. If the pointer does not rest at the center of the index, then it will be necessary to level the balance left to right.
- Arrest the balance and place the required weights on the right pan. Place the material to be weighed on the left pan.
- Release the balance and note the shift of the pointer on the index. If the pointer shifts left, too much of the substance is on the pan and a portion should be removed. If it shifts right, there is too little of the substance and more should be added. Using a spatula, remove or add material; arrest the balance each time before a transfer is made.
- Once you are satisfied that you have made an accurate measurement, double check to make sure that you have weighed the correct substance (check the label) and that you have used the correct weights (internal and external).
Electronic balance and analytical balance
Electronic and analytical balances have digital displays and may have internal calibration capabilities. These may either be top-loading or encased to protect the balance from dust and drafts. Electronic balances generally have a greater level of accuracy than a prescription balance.
An analytical balance is used to measure mass to a very high degree of precision and accuracy. The measuring pan(s) of a high precision (0.1 mg or better) analytical balance are inside a transparent enclosure with doors so that dust does not collect and so any air currents in the room do not affect the balance's operation. An analytical balance is usually ten-fold more accurate than an electronic balance.
To use either balance, follow these guidelines:
- Always use the balance on a level surface in a draft free area
- If the balance has a level bubble, make sure the bubble is inside the bulls eye and make adjustments in the leveling feet as needed
- Place a weighing boat or a single sheet of weighing paper on the pan
- When the balance has determined the final weight, press the tare bar to compensate for the weight of the weighing boat.
- As ingredients are added or removed from the weighing boat, the digital display will show the weight of the ingredient in the boat.
- As ingredients are added or removed from the weighing boat. Make sure the balance has determined the final weight before adding or removing any ingredient
Measuring
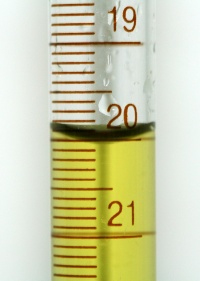
Graduates (both cylinders and conical), volumetric flasks (such as Erlenmeyer flasks and beakers), burettes, pipettes, medicine droppers, and syringes are examples of volumetric equipment. The term volumetric simply means measures volume, therefore volumetric equipment is used for measuring volumes of liquid. Volumetric vessels are either to deliver (TD) or to contain (TC). To deliver means that the vessel must be completely emptied to dispense the needed volume. Single volume pipettes, syringes, droppers and small calibrated pipettes are TD vessels. To contain means that the vessel does not need to be completely emptied to dispense the needed volume. Volumetric flasks, graduates, and some calibrated pipettes are TC vessels.For maximum accuracy in measuring, select a measuring device with a capacity equal to or slightly larger than the volume to be measured. As graduated cylinders are usually more accurate than conical graduates or Erlenmeyer flasks we will focus on them. The general rule is to measure volumes no less than 20% of the capacity of a graduate. For example, 2 mL would be the minimum measurable quantity (MMQ) for a 10 mL graduate. Whenever you are measuring items in a graduated cylinder, you should look at the bottom of the meniscus. The meniscus is the curve in the upper surface of a liquid close to the surface of the container or another object, caused by surface tension. Water and oil based substances typically have a concave meniscus as demonstrated in the image on the right.
Definitions
trituration
- A method to reduce particle size (comminution); it may also include the grinding together of two or more substances in a mortar to mix them as you should want a fine powder to make incorporation better. Trituration is achieved by firmly holding the pestle and exerting a downward pressure with it while moving it in successively larger circles starting at the center of the mortar, moving outward to the side of the mortar, then back again toward the center.
spatulation
- The mixing of powders on an ointment pad or slab using a spatula. With this method there is no particle size reduction, so the powders to be mixed must be fine and of uniform size.
geometric dilution or geometric incorporation
- Geometric dilution is the process by which a homogenous mixture of even distribution of two or more substances is achieved. When using this method, the smallest quantity of active ingredient is mixed thoroughly with a proportion quantity of the diluent or base on the ointment slab. More diluient (base) is added in amounts proportionate to the volume of the mixture on the ointment slab. This process is repeated until all of the ingredients are incorporated in the mixture.
levigation
- The process of reducing particle size of a solid by triturating it in a mortar or spatulating it on an ointment slab or pad with a small amount of a liquid called a levigating agent. Levigating agents make incorporating solids easier, and they make a smooth, elegant preparation.
- Choose a levigating agent (the liguid) similar to the ointment base. For example, mineral oil is the levigating agent of choice for oily bases. Glycerin, which is mixable with water, is usually used for water-soluble bases. Often the ointment formulation contains an ingredient that can be used as a levigating agent. This is the preferred situation.
- The prescription order may not have the levigating agent listed, therefore use the minimum amount of levigating agent necessary to lubricate the powders. The amount used depends on the amount of powder to be levigated. Unless the prescription calls for a given amount of levigating agent, the minimum amount is recommended. You need to note this on the prescription order or compounding log. The formula may already contain a liquid that is a suitable levigating agent that liquid should be used.
- A levigating agetn is NOT needed when:
- the solid being incorporated has a very fine particle size,
- the quantity of solid to incorporate is small,
- the ointment base is soft,
- the final product is to be a stiff ointment or paste.
Compounded dosage forms
Compounding pharmacies are capable of preparing a broad array of dosage forms including capsules, tablets, oral suspensions and solutions, suppositories, troches (lozenges), various topical dosage forms (gels, lotions, ointments, creams), lollipops, and more. One of the things that tends to make compounding both interesting and difficult is finding the best way to manipulate a dosage form to benefit a patient.
Labeling
Product labels for extemporaneous compounds must follow all federal and provincial requirements. Necessary items to include on the label are:
- the name of the preparation;
- the internal identification number;
- the beyond-use date
- the initials of the compounder who prepared the product;
- any storage requirements; and
- any other statements required by law.
Beyond-use date
The requirement to provide a beyond-use date sometimes causes confusion as there is some ambiguity between what an expiration date is and what a beyond-use date is. An expiration date is the date put on the label of a drug product by the manufacturer or distributor of the product. Federal law requires that manufactured (compounding is not considered manufacturing) drug products be labeled with an expiration date. The beyond-use date is the date placed on a prescription bottle by a pharmacy noting when that prescription should no longer be used. The AMA states, "The beyond-use date placed on the label shall be no later than the expiration date on the manufacturer’s container. The beyond-use date is a date after which an article [drug] must not be used. Based on the information supplied by the manufacturer, the dispenser shall place on the label of the prescription container a suitable beyond-use date to limit the patient’s use of the article."
For water containing formulations, prepared from ingredients in solid form, the beyond use date is not later than 14 days when stored at cold temperatures. Generally, a two-week dating is the maximum for ointments containing water if a preservative is not present. Ointment with water are subject to microbial growth. Ointments without water can have much longer dating. Ointment jars, although widely used, expose the preparation to air and microbial contamination when opened and when the ointment is removed using the fingers. The maximum beyond-use date for a very stable preparation would be 6 months or 25% of the time remaining between the time of compounding and the shortest expiration date of the ingredients, whichever is earlier. You need to consult available literature if possible and professional judgment is required in these cases. For all other formulations, the beyond-use date is not later than the intended duration of therapy or 30 days, whichever is earlier.
See also
Food and Drug Administration Modernization Act
References
- Tech Lectures For the Pharmacy Technician, Section XXIV - Principles of Compounding, http://www.tlectures.com/compounding.pdf
- U.S. Pharmacopeia 29th Edition, USP <795> - Pharmaceutical Compounding - Nonsterile Preparations, http://www.pharmacopeia.cn/v29240/usp29nf24s0_c795.html
- About.com, Are Beyond-Use Dates Different Than Expiration Dates?, January 16, 2011, http://bipolar.about.com/od/medications/a/beyond_use.htm
- Ontario College of Pharmacists, Guidelines for Compounding Preparations, http://www.ocpinfo.com/client/ocp/OCPHome.nsf/web/Guidelines+to+Compounding+Preparations
- Practical Guide to Contemporary Pharmacy Practice Third Edition, Judith Thompson, LWW, January 16, 2009, ISBN: 9780781783965
- International Journal of Pharmaceutical Compounding, Basics of Compounding: Implementing United States Pharmacopeia Chapter <795> Pharmaceutical Compounding-Nonsterile Preparations, Part 1, Loyd V Allen, Jr., PhD RPh, Vol. 15 No. 4, July/August 2011


